Struggling with poor image quality and dull colours? An easy and budget-friendly way to fix this is to calibrate your gaming monitor. Calibrating your monitor may sound scary and far too complicated but, in reality, it’s super simple to achieve, especially as Windows includes built-in calibration tools.
To ensure you don’t have to go it alone, we’ve compiled this handy post detailing everything you need to know, including what calibrating means and why you should do it. Plus, we’ve even created a step-by-step guide showcasing how to successfully calibrate your gaming monitor.
Grab a hot drink, pen, and paper to take notes, and let’s jump straight in!
What Does Calibrating Your Monitor Mean?
Monitor calibration can notably help to improve image quality and consistency, colour representation, brightness, contrast, and more. All of which work in sync to ensure you achieve the best possible performance and comfort, especially if you are gaming, streaming, or creating for long hours.
What Settings Can be Calibrated
There are multiple display settings that can be calibrated. This includes:
- Backlight – Adjusts the amount of light your monitor creates to help make it notably brighter.
- Picture – A typical monitor comes with three default picture pre-sets (Standard, Movie, Dynamic). These pre-sets alter most, if not all, the image settings and are easy to flick between to find the one that suits your preferences and needs.
- Brightness – Adjusts the way in which your monitor handles dark colours. Too high, and blacks will appear grey.
- Contrast – Refers to the difference between the darkest blacks and brightest whites in images.
- Gamma – Affects how the contrast can change at different levels of brightness.
- Colour Temperature – Adjusts the ‘temperature’ of your display. Cooler provides a blue tint while a warmer temperature delivers an orange/yellow tint.
- Game Mode – Some gaming monitors will feature a dedicated ‘Game Mode’ designed to lower monitor input lag without affecting the overall image quality or response times.
- Low Blue Light – The blue light filter can help to eliminate eye strain by reducing the amount of blue light created by your display, generating an amber tint to any images on screen.
Why Should You Calibrate Your Gaming Monitor
Have you ever noticed your display looking a little dark compared to others? Colours appearing washed out or not as vibrant and text becoming hard to read? Calibrating your monitor can help to resolve all these issues, possibly eliminating the need for you to spend extra on an expensive monitor upgrade.
What’s more, calibrating your display settings can help to eliminate any eyestrain or fatigue, enhancing your ergonomics to ensure you stay comfortable for longer. This is especially beneficial for those who use their PC for work or appreciate a good late night gaming marathon.
How to Calibrate Your Gaming Monitor
Before you jump ahead and calibrate your gaming monitor, we recommend you consider your environment, especially the light in the room where you’ll be using your PC. In rooms with lots of windows or large windows, the level of brightness and even colour temperature can notably change throughout the day. For example, in my office, it starts out super bright in the morning and slowly changes as the sun moves over the house. This can have a big impact on how colours look on your screen and may also influence which settings are best for brightness, contrast, and more.
Windows 10 and 11 both come equipped with integrated calibration tools to streamline the process and make it much simpler. In our step-by-step guide below, we’ll be using Windows 11, however, the steps are virtually identical for Windows 10.
First up, begin by typing calibrate in the search bar and then select Calibrate Display Colour. This will open up the built-in calibration tool. If you have more than one monitor connected, you’ll need to follow the on-screen instructions on the first screen to ensure you are adjusting the correct display.
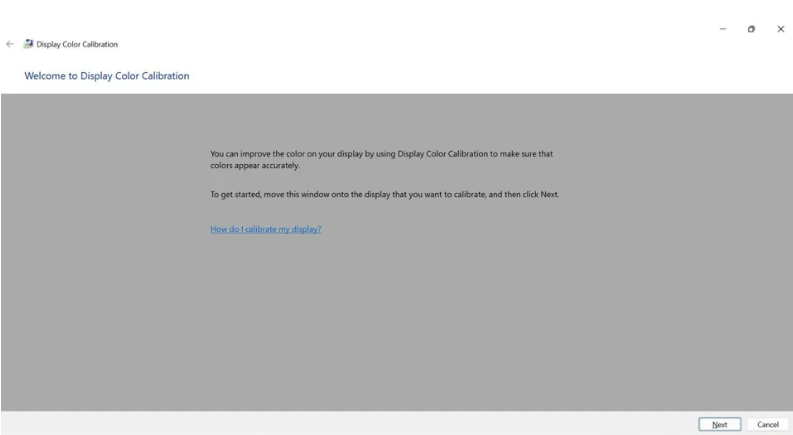
You may receive a pop-up warning stating that your display uses a wide gamut colour profile and asking if you wish to continue calibrating your monitor. In this case, select ‘No’, and skip ahead in this guide to where we mention Windows HDR.
If your monitor isn’t compatible with a wide colour gamut, you won’t see this pop-up. Instead, you’ll see instructions to set your display to its factory default settings (if possible). Follow this, and then click ‘Next’.
From here, you’ll move on to adjusting gamma.
Gamma
Gamma determines how the contrast changes at different brightness levels. Gamma all depends on the ambient lighting in your room, so you’ll want to ensure you adjust this setting to suit the lighting you work in the most. You’ll be presented with three samples showcasing what it looks like with the gamma too low, set properly, and too high.
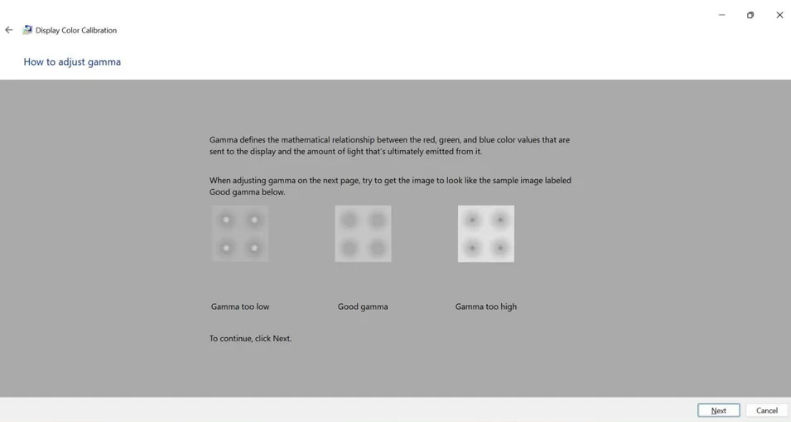
Look at these three samples carefully, get familiar with their differences, and then select ‘Next’ when you’re ready to move on and make the changes. Utilise the on-screen slider to adjust the gamma until the dots inside each circle are virtually undetachable, or at least hard to see.
If you get confused or struggle with this step, you can easily use the back arrow to look at the examples once again to help you find the perfect gamma settings. We also recommend you utilise the arrow keys on your keyboard over your mouse as this will allow you to move the slider one step at a time.
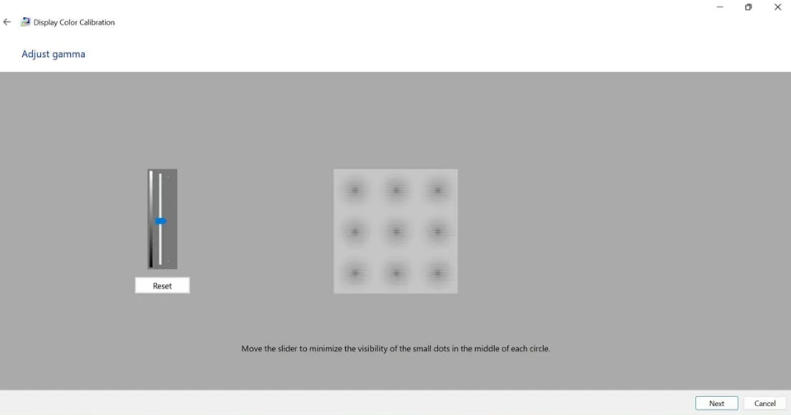
Once you’re happy with the chosen gamma settings, select ‘Next’ to continue calibrating.
Brightness and Contrast
You’ll have the option to skip adjusting the brightness and contrast, however, we suggest you don’t do this. Brightness and contrast are two vital settings that can seriously change how images are displayed on screen. If you don’t want to skip, choose ‘Next’.
You’ll be shown three examples of brightness – too dark, good brightness, and too bright. Again, familiarise yourself with the differences before you move on. When you’re ready, follow the on-screen instructions to carefully match your monitor’s brightness to that of the good brightness example. The X in the background should be barely visible, and ideally there should be a shadow on the shoulder of the suit jacket (monitor depending).
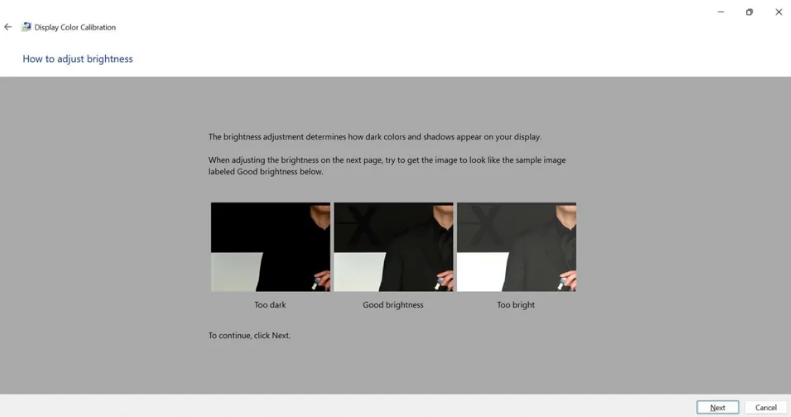
Once you’re happy with your brightness settings, select ‘Next’ to move on to contrast.
It’s virtually the same as adjusting the brightness setting. First, you’ll be shown three examples, one with the contrast set too low, too high, and just right. From here, you’ll then see a larger version of the same image and using your monitor’s contrast control, you’ll want to bring the contrast up as high as you can. Make sure, however, that you don’t lose any details in the white shirt, the last button should be as clear as the first.
When you’re happy with the contrast, click ‘Next’ to move on to the next step.
Colour Balance
Colour balance allows you to remove any unwanted tints in greyscale from nearly white to dark grey. This setting ensures you achieve the best true-to-life colour representation possible.
First, you’ll be shown examples of how the greys will look with each of the six possible colour error combinations (three with too much of only one primary colour and three with too much of two primary colours). The ideal setting here is to have neutral greys in all five swatches.
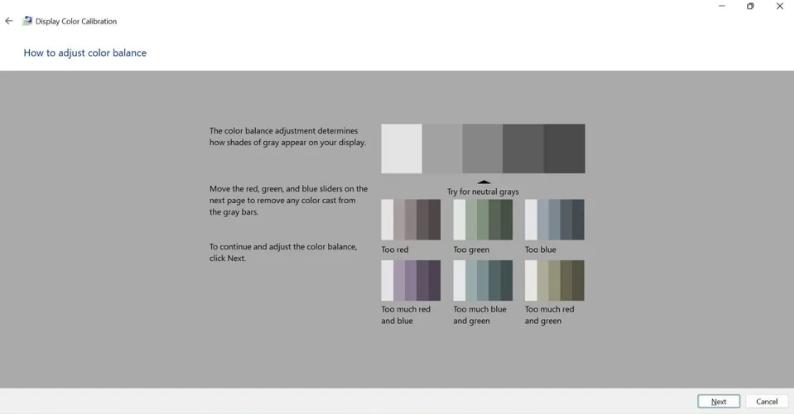
We recommend you familiarise yourself with the examples before you move on.
To adjust, carefully match the neutral example from the first page, utilising the sliders for red, green, and blue. Similar to gamma, we suggest you use the arrow keys rather than dragging the sliders up and down with your mouse.
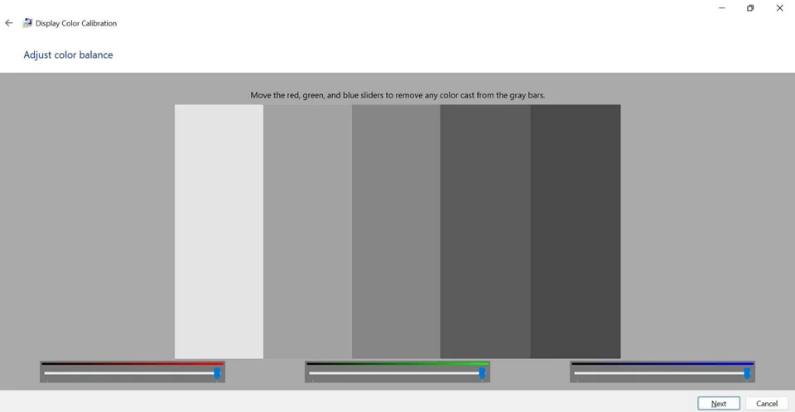
Once you’re happy with the result, select ‘Next’.
Checking the Result
After this, you’ll be able to compare your newly calibrated monitor to its previous settings. To truly see the difference, we recommend you bring up a photo and flip between the before and after settings.
Before you exit, make sure you select which of the two calibrations you want to use before you select ‘Finish’. ClearType Text Tuner will automatically open when you close down this window.
ClearType
ClearType Text Tuner allows you to calibrate your display further by enhancing the text to appear sharper and easier to read.
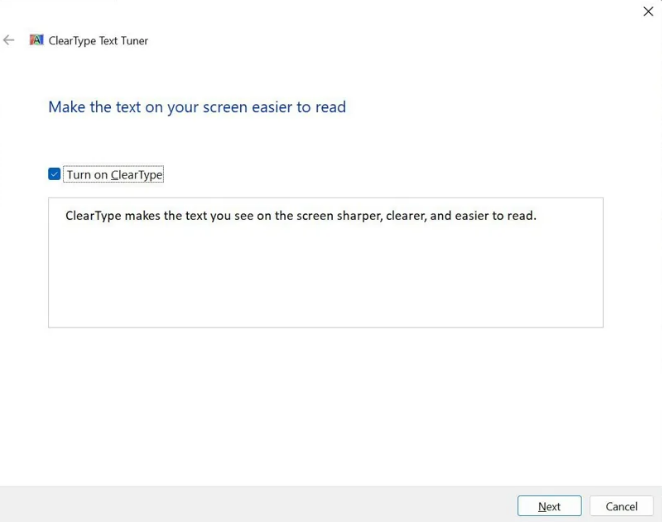
If you have two monitors, similar to the built-in calibration tool, you’ll need to ensure you’ve selected the display you wish to configure. If you want to adjust both monitors simultaneously, you’ll need to go through each step twice, one monitor at a time.
From here, you’ll be able to see if your monitor is set to its native resolution. If not, you’ll be given the option to set to that resolution, which will happen automatically once you click ‘Next’. Please note, once you select ‘Next’, you won’t be able to revert to the previous resolution. You’ll need to exit ClearType and go through your Display Settings to adjust the resolution again.
After this, you’ll be given five different examples of text. On each screen, you’ll need to select the text that looks the best. And that’s it. Once you select ‘Finish’, your monitor has been successfully calibrated for SDR.
Calibrating for HDR
Hello to everyone who skipped straight ahead to this step!
While Windows 10 supports HDR to some extent, Windows 11 has expanded on this further. HDR is now automatically turned on, adding it to any SDR content to give it a much-needed boost and display your images in stunning high-definition.
To calibrate HDR, go into your Display Settings and find Use HDR. Here you’ll be able to turn on/off HDR (if your system supports it). Clicking the arrow next to the on/off control will give you more information about what type of HDR is supported and show you even more options, including a slider for setting HDR brightness. If you wish to fine-tune HDR even further, you’ll need to download the free Windows HDR Calibration Utility separately. You can find this on the Microsoft Store.
Improvements made to HDR is one of many key differences between Windows 10 and 11. If you want to see the others, be sure to check out our blog post.
Tried Everything?
Have you tried calibrating your monitor to no avail? Is your display still struggling with poor performance and image quality? It might be time to say goodbye and treat yourself to a monitor upgrade.
At Overclockers UK, we stock an extensive range of gaming monitors available in a wide variety of sizes, resolutions, refresh rates, panel types, and more. If you want to browse our full selection, you can do so by clicking the button below!
Looking for Extra Advice?
Did You Calibrate Your Gaming Monitor?
Did you calibrate your gaming monitor? How has it helped your performance or image quality? Do you have any extra tips that we missed? Share them in the comments!


