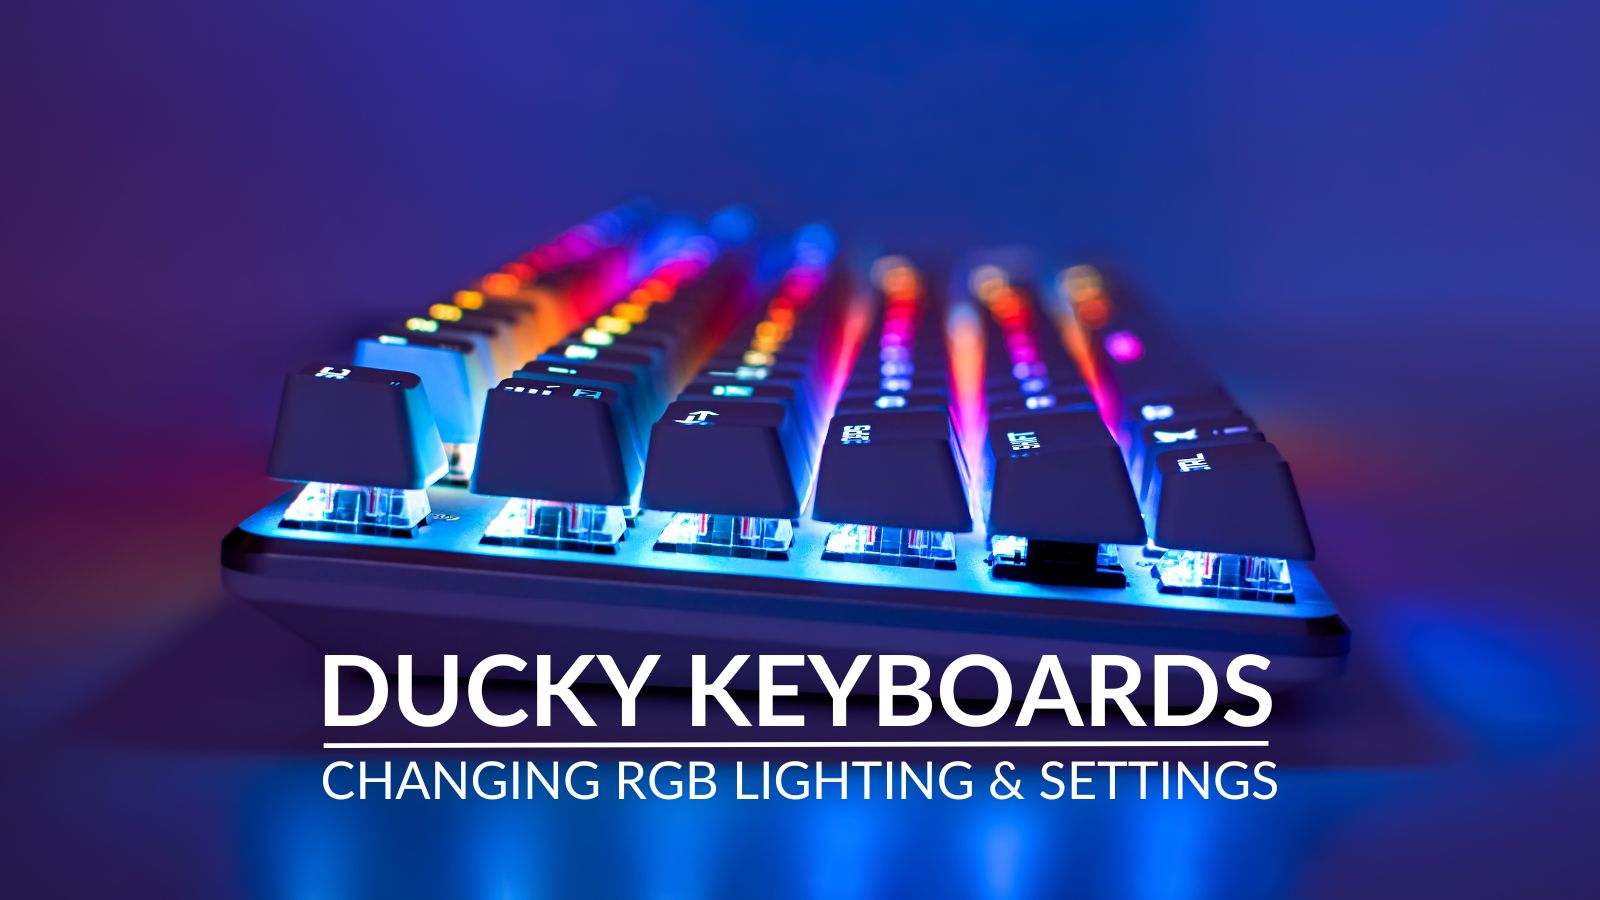
Have you recently purchased a Ducky keyboard and want to add a splash of colour to your battle station? Then look no further!
Here at Overclockers UK, we’ve compiled all of our expert knowledge about Ducky’s incredible range of gaming keyboards into one handy article. Including, how to adjust the RGB lighting and all of the relevant keyboard shortcuts to help boost your workflow and productivity.
RGB Lighting
We’ve listed the key bindings to adjust the RGB backlighting across multiple popular Ducky keyboards, including the One 2, Shine 6, One 3, and Project D Tinker. These bindings are in the user manual for your keyboard, which you can find online.
Before you begin, we recommend you check if your model does include RGB as not all Ducky keyboards have this feature. This can be found on the manufacturer’s page and is often mentioned in the name of your model. For example, One 2 Mini RGB.
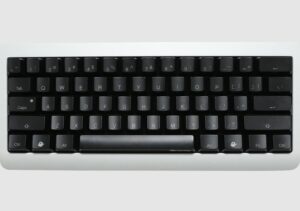
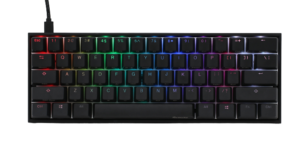
Ducky Mini
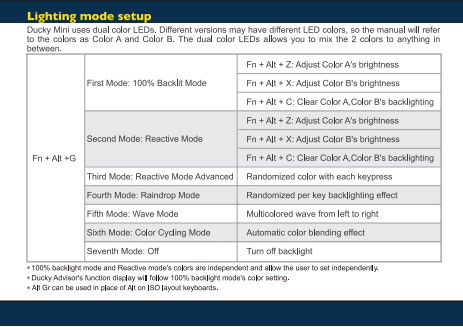
The Ducky Mini features per-key RGB backlighting and LED zone recording which you can configure to suit your personal style.
Please note, the Mini utilises dual colour LEDs which we will refer to as Colour A and B as per the official manual.
RGB Backlit Mode
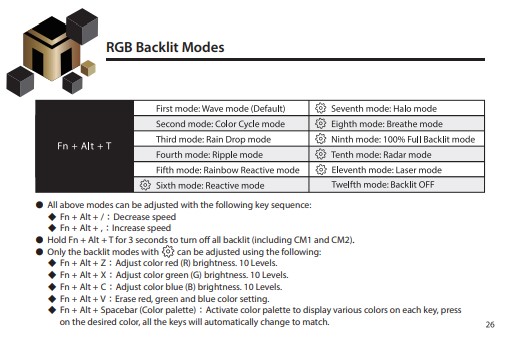
Pressing Fn + Alt + G will cycle through the different lighting effects included on the Ducky Mini. This includes:
- 100% backlit
- Reactive
- Reactive Advanced
- Raindrop
- Wave
- Colour Cycle
- All RGB Off
Selecting the following shortcuts will adjust these lighting effects further by:
- Fn + Alt + Z – Customise colour A brightness
- Fn + Alt + X – Customise colour B brightness
- Fn + Alt + C – Clear colour A or B backlighting
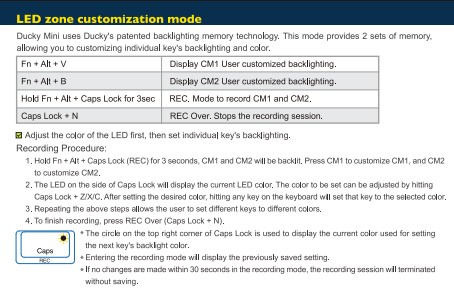
RGB LED Zone Recording
With the Ducky Mini, you can also establish individual LED zones which you can customise to suit your aesthetic. To do so, you’ll need the following shortcuts:
- Fn + Alt + V – Display CM1 cycle backlighting.
- Fn + Alt + B – Display CM2 cycle backlighting.
- CapsLock + N – Stops recording.
You can record your lighting effects by pressing:
- Fn + Alt + CapsLock for three seconds to start recording. CM1 and CM2 will light up. Press Fn + Alt + V to adjust CM1 or Fn + Alt + B to configure CM2 cycles.
- When recording, CapsLock will display your current LED colour. This colour can be adjusted by pressing CapsLock + Z/X/C. After selecting your desired colour, pressing any key on the keyboard will automatically set that key to your chosen colour.
- Repeating the above steps will allow you to set different colours to different keys. If the key has already been set, press it again to cancel the setting.
- To finish recording press CapsLock + N.
Ducky Mecha Mini
The Ducky Mecha Mini includes RGB backlighting which features different lighting modes. You can adjust the colour and effect to suit your aesthetic, along with customising your own LED zone lighting.
RGB Backlit Mode
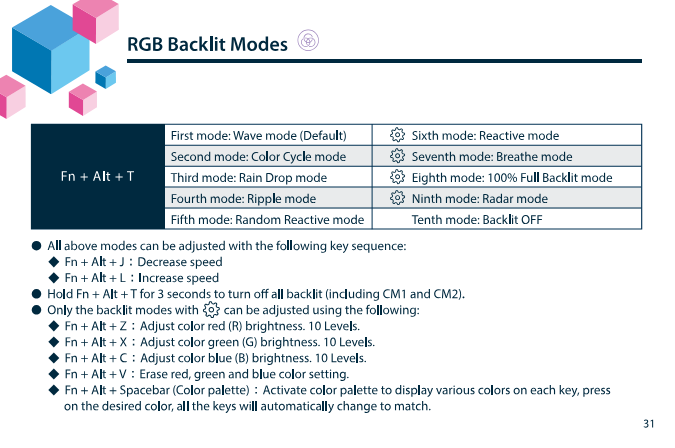
Pressing Fn + Alt + T will let you flick between the different RGB modes, from Wave to Breathe. If you wish to increase or decrease the speed of the effect by pressing Fn + Alt + J (to decrease) or Fn + Alt + L (to increase).
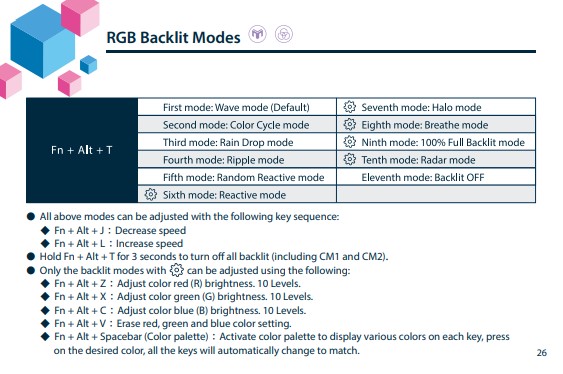
Certain backlit modes highlighted with the cog (shown in the image above) can be customised further.
- Fn + Alt + Z – will adjust red brightness by up to 10 levels.
- Fn + Alt + X – will adjust green brightness by up to 10 levels.
- Fn + Alt + C – will adjust blue brightness by up to 10 levels.
- Fn + Alt + V – will erase all red, green, and blue settings.
- Fn + Alt + Spacebar – will activate the colour palette and display various colours on each key. Pressing on the desired colour will automatically change all keys to match.
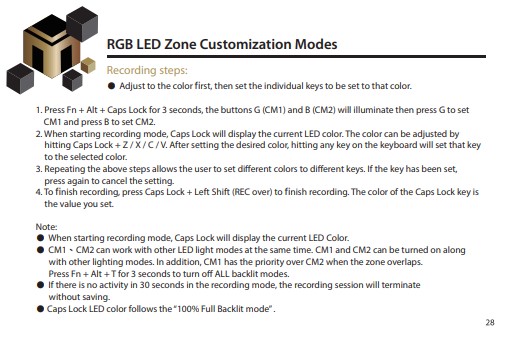
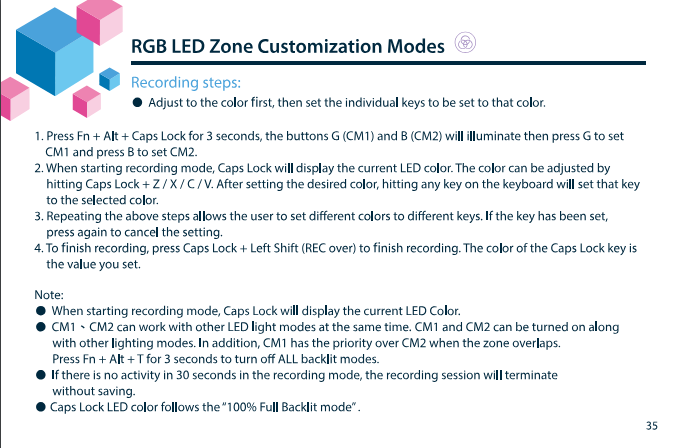
RGB LED Zone Customisation
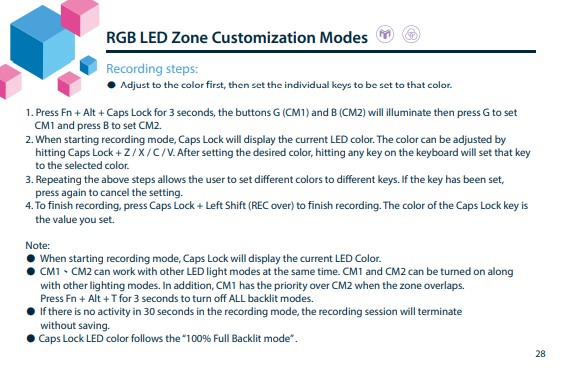
You can also record your own RGB effects.
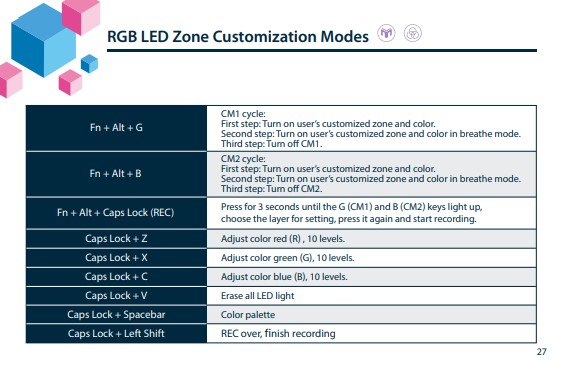
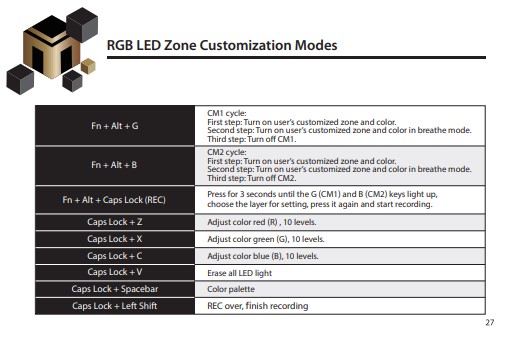
- Fn + Alt + G (CM1 cycle) – turns on the user’s customised zone and colour. Pressing it again will automatically adjust this zone to Breath mode. Pressing this shortcut a third time will turn off the CM1 cycle.
- Fn + Alt + B (CM2 cycle) – turns on the user’s customised zone and colour. Pressing it again will adjust the zone to Breathe mode, and pressing the shortcut a third time will turn off the CM2 cycle.
- Fn + Alt + CapsLock – press for 3 seconds until the G (CM1) and B (CM2) keys light up, choose the layer for setting, and press the shortcut again to start recording.
- CapsLock + Z – adjust colour red by up to 10 levels.
- CapsLock + X – adjust colour green by up to 10 levels.
- CapsLock + C – adjust colour blue by up to 10 levels.
- CapsLock + V – erases all LED light.
- CapsLock + Spacebar – turns on the colour palette.
- CapsLock + LeftShift – stops recording.
To record your own effects, you’ll need to press the following shortcuts.
- Fn + Alt + CapsLock for 3 seconds. The G (CM1) and B (CM2) keys will light up. Depending on which zone you want to customise press G or B.
- When recording, CapsLock will display your current LED colour. This colour can be adjusted by pressing CapsLock + Z/X/C/V. After selecting your desired colour, pressing any key on the keyboard will automatically set that key to your chosen colour.
- Repeating the above steps will allow the user to set different colours to different keys. If the key has already been set, press it again to cancel the setting.
- To finish your recording, press CapsLock + LeftShift. The colour of the CapsLock key is the value you set.
Ducky Mecha Pro
The Ducky Mecha Pro also features an RGB backlit and customisable LED zones. You can configure both of these to suit your individual aesthetic.
RGB Backlit
Pressing Fn + Alt + T will take you through all the different RGB modes such as Rain Drop and Ripple. You can adjust these lighting effects further by pressing:
- Fn + Alt + / – to decrease the speed.
- Fn + Alt + , – to increase the speed.
- Hold Fn + Alt + T for three seconds to turn off all backlighting (including CM1 and CM2).
Only RGB effects highlighted with a cog can be adjusted further by pressing:
- Fn + Alt + Z – Adjust colour red brightness for up to 10 levels.
- Fn + Alt + X – Adjust colour green brightness for up to 10 levels.
- Fn + Alt + C – Adjust colour blue brightness for up to 10 levels.
- Fn + Alt + V – Erase all red, green, and blue colour settings.
- Fn + Alt + Spacebar – Turns on the colour palette to display various colours on each key. Pressing on the desired colour will automatically change all the keys to that colour.
RGB LED Zone Recording
What’s more, you can also create your own RGB LED zones.
- Fn + Alt + G (CM1 cycle) – turns on the user’s customisable zone. Pressing the shortcut again will automatically adjust the zone to be in Breathe mode, and pressing it for a third time will turn off the CM1 cycle.
- Fn + Alt + B (CM2 cycle) – turns on the user’s customisable zone. Pressing it a second time will adjust the zone to be in Breathe mode, and pressing it again will turn off the CM2 cycle.
- Fn + Alt + CapsLock – starts recording. Press for three seconds until the G (CM1) and B (CM2) keys light up. Choose your desired zone and press the shortcut again to start recording.
- CapsLock + Z – Adjust colour red up to 10 levels.
- CapsLock + X – Adjust colour green up to 10 levels.
- CapsLock + C – Adjust colour blue up to 10 levels.
- CapsLock + V – Erases all LED light.
- CapsLock + Spacebar – Enters the colour palette.
- CapsLock + LeftShift – End recording.
To record your lighting effects on your Ducky Mecha Pro, you’ll need to press the following:
- Press Fn + Alt + CapsLock for 3 seconds until the G (CM1) and B (CM2) keys light up. Press G to adjust CM1 or B to configure CM2.
- When entering recording mode, the CapsLock key will display your current LED colour. The colour can be adjusted by hitting CapsLock + Z / X / C / V. After selecting your desired colour, pressing any key on the keyboard will automatically adjust it to that colour.
- Repeating the steps listed above will allow you to set different colours to contrasting keys. If the key has already been set, pressing it again will cancel the setting.
- To finish your recording, press CapsLock + Left Shift.
Ducky One 2 Mini RGB
The Ducky One 2 Mini RGB has customisable backlit and LED zone RGB recording. Both of which you can configure to perfectly suit your aesthetic.
RGB Backlit Mode
Pressing FN + Alt + T will allow you to flick between all the different RGB modes, from Wave to Rain Drop. If you wish to increase or decrease the speed of the lighting effect, you do so by pressing Fn + Alt + J (to decrease) or Fn + Alt + L (to increase).
Certain RGB modes highlighted with a cog in the manual can be further adjusted.
- Fn + Alt + Z – adjust red brightness. 10 different levels.
- Fn + Alt + X – adjust green brightness. 10 different levels.
- Fn + Alt + C – adjust blue brightness. 10 different levels.
- Fn + Alt + V – erase red, green, and blue colour setting.
- Fn + Alt + Spacebar – activate the colour palette to display various colours with key. Press on the desired colour to make all the keys automatically match.
Alternatively, you can cycle through static colours by pressing Fn and +/-.
RGB LED Zone Recording
Alternatively, you can record your own unique RGB effects. The key bindings you need to successfully do this are;
- Fn + Alt + G (CM1 cycle): turns on the user’s customised zone and colour, then adjusts this to breathe mode, thirdly will turn off the CM1cycle.
- Fn + Alt + B (CM2 cycle): turn on the user’s customised zone and colour, adjusts this to breathe mode, and finally will turn off the CM2 cycle.
- Fn + Alt + Caps Lock): start recording your RGB. Press and hold this combination for three seconds until the G (CM1) and B (CM2) keys light up. Choose the layer you wish to adjust, press it again, and begin your recording.
- Caps Lock + Z: decreases the brightness.
- Caps Lock + X: increases the brightness.
The steps you need to follow to record your own RGB lighting effects are as follows;
- Press Fn + Alt + Caps Lock for three seconds until the G (CM1) and B (CM2) keys light up. Press G to adjust CM1 or B to customise CM2.
- When you begin to record, the Caps Lock key will display the current LED colour. This colour can be adjusted by pressing Caps Lock + Z, X, C, or V. After you’ve selected your desired colour, pressing any key will automatically set that key to your chosen colour.
- Repeating the above steps allows you to set different colours to different keys. If the key has been set, press it again to cancel.
- To finish your recording, press Caps Lock + Left Shift. The colour of the Caps Lock key is the value you set.
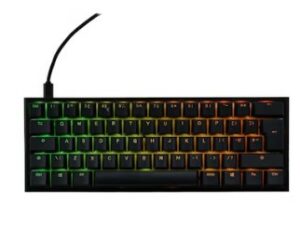
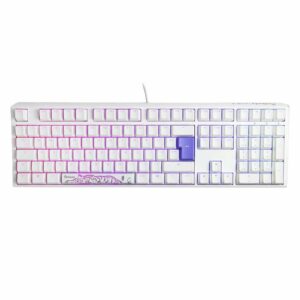
Ducky One 2 Pro
The Ducky One 2 Pro features customisable side and keyboard backlighting along with LED zone RGB recording. You can configure both the colour and effect to perfectly match your aesthetic and the rest of your hardware.
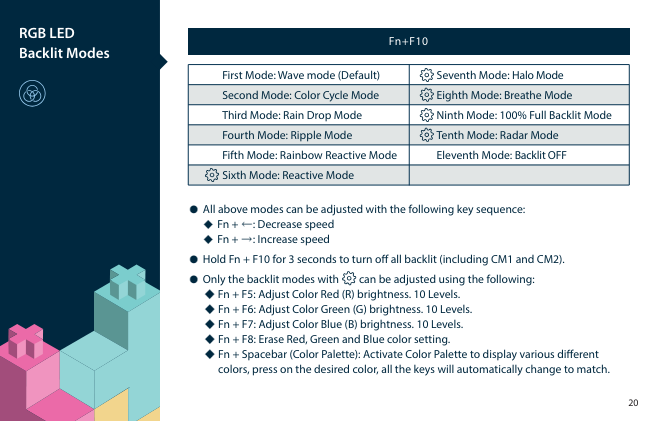
RGB LED Backlit
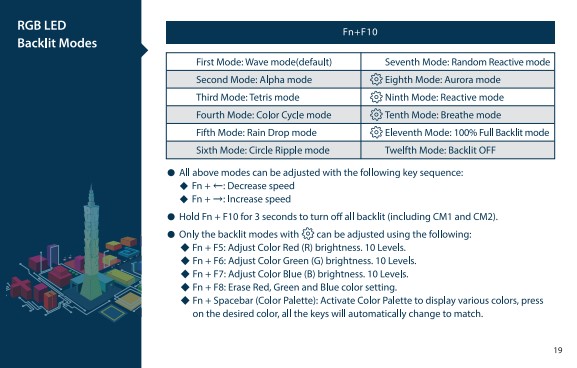
Pressing Fn + F10 will cycle through the different lighting effects such as Tetris or Rain Drop. You can decrease or increase the speed of the effect by pressing (← / →). Holding Fn + F10 for 3 seconds will turn off all backlit modes, including the CM1 and CM2.
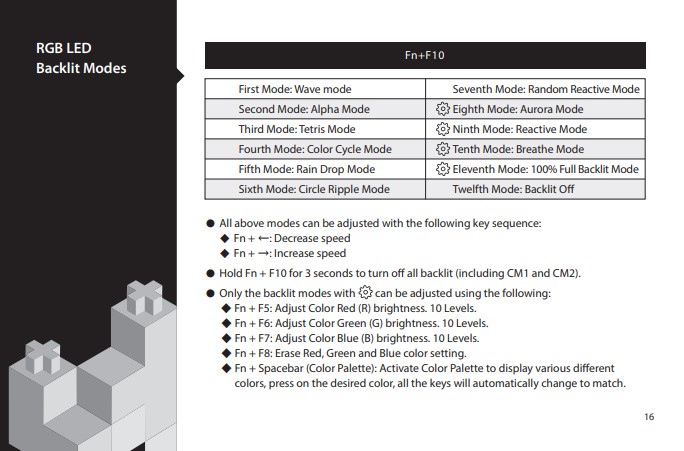
Only backlit modes with the cog (as shown above) can be configured further. You can do this by pressing:
- Fn + F5 – Adjust colour red brightness by up to 10 levels.
- Fn + F6 – Adjust colour green brightness by up to 10 levels.
- Fn + F7 – Adjust colour blue brightness by up to 10 levels.
- Fn + F8 – Erases all red, green, and blue colour settings.
- Fn + Spacebar – Enters the colour palette which displays various colours. Pressing on the desired colour will automatically change your keyboard to match.
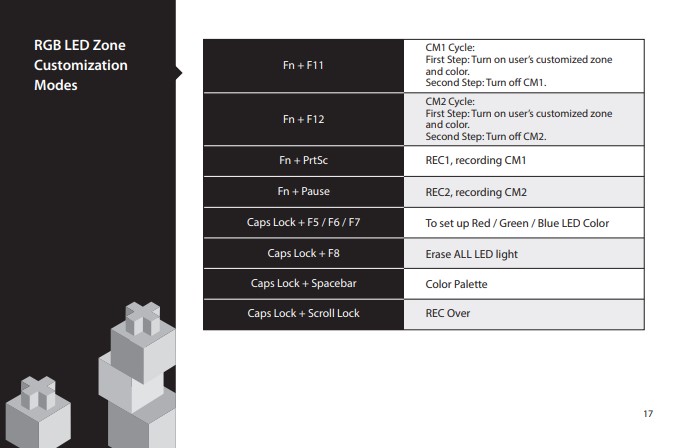
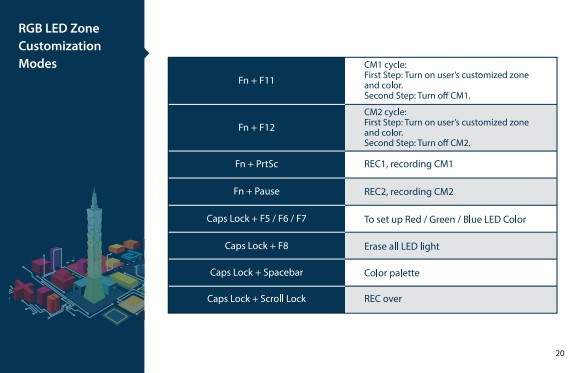
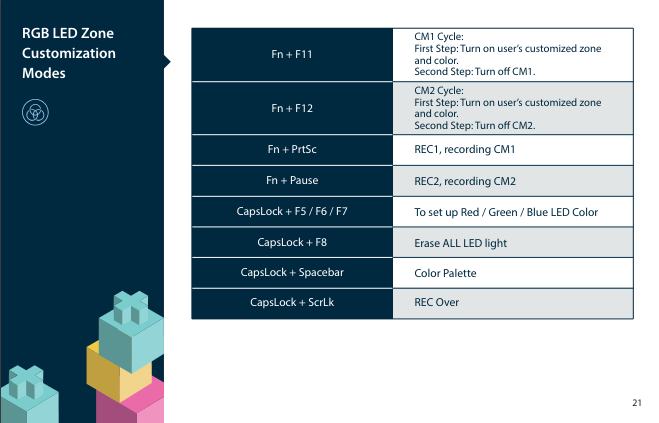
RGB LED Zones Customisation
To configure the separate RGB LED Zones, you’ll need to remember the following shortcuts:
- Fn + F11 – Enters the CM1 cycle. Pressing this shortcut again will turn off the CM1.
- Fn + F12 – Enters the CM2 cycle. Pressing this shortcut again will turn off the CM2.
- Fn + PrtSc – Records CM1.
- Fn + Pause – Records CM2.
- CapsLock + F5/F6/F7 – Adjusts red, green, and blue LED colour.
- CapsLock + F8 – Erases all LED light.
- CapsLock + Spacebar – Enters the colour palette.
- CapsLock + Scroll Lock – Stops recording.
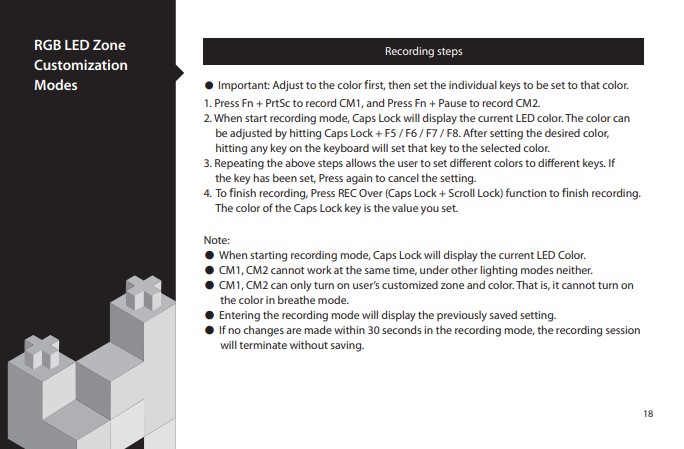
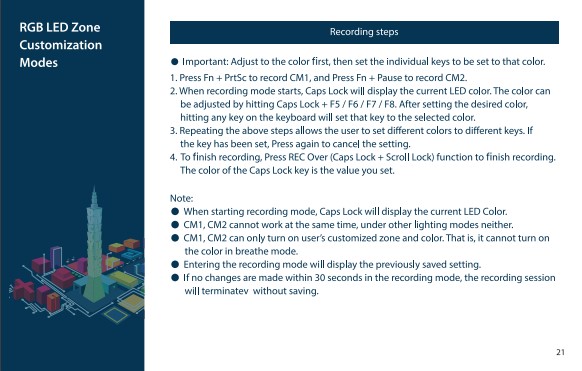
To record your lighting effects, press:
- Fn + PrtSc to start recording CM1 or Fn + Pause to record CM2.
- When recording, CapsLock will display your current LED colour. This can be adjuted by pressing CapsLock + F5 / F6 / F7 / F8. After setting your chosen colour, pressing any key on your keyboard will automatically adjust it to that colour.
- Repeating the steps listed above will allow you to configure alternating colours to different keys. If a key has already been set, press it again to cancel the setting.
- To stop recording, press CapsLock + Scroll Lock.
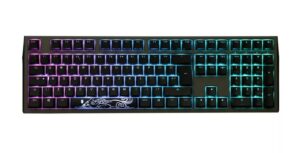
Ducky Shine 6
The Ducky Shine 6 features customisable side and keyboard backlighting along with LED zone RGB recording. You can configure both the colour and effect to perfectly match your aesthetic and the rest of your hardware.
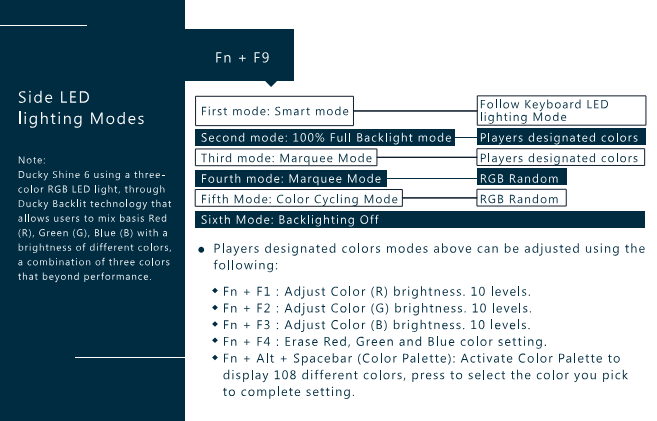
Side LED Backlit
Pressing Fn + F9 will cycle through all the different lighting effects on your Shine 6.
- First (Smart Mode) – follows the Keyboard LED lighting mode.
- Second (10% Full Backlight Mode) – players customise the colours.
- Third (Marquee Mode) – players customise the colours.
- Fourth (Marquee Mode) – RGB is random.
- Fifth (Colour Cycling Mode) – RGB is random.
- Six – RGB turned off.
What’s more, you can cycle through static colours by pressing Fn and +/-.
You can adjust the RGB further by configuring the brightness. You can do this by pressing:
- Fn + F1 – adjusts red brightness. 10 different levels.
- Fn + F2 – adjusts green brightness. 10 different levels.
- Fn + F3 – adjusts blue brightness. 10 different levels.
- Fn + F4 – erases all red, green, and blue colour settings.
- Fn + Alt + Spacebar – activates the colour palette with 108 different colours to choose from. Press again to select the colour you desire.
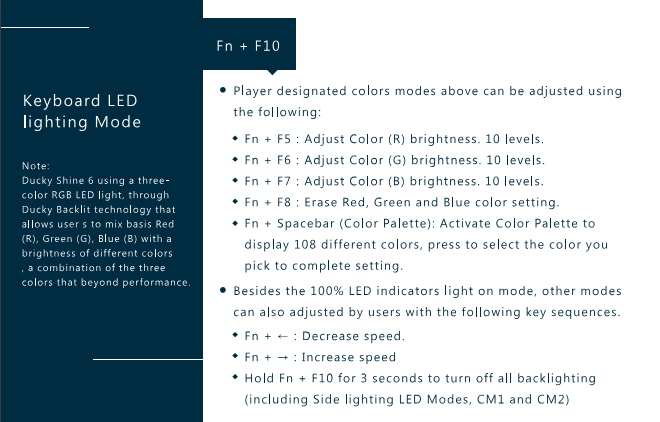
Keyboard LED
If you press both Fn + F10, you can cycle through all the RGB effects for the full keyboard. This includes;
- First (100% Full Backlight Mode) – players choose the colours.
- Second (Breathing) – players can choose the colours.
- Third (Colour Cycling) – RGB is random.
- Fourth (Wave) – RGB is random.
- Fifth (Rain Drop) – RGB is random.
- Sixth (Reactive Mode Advanced) – RGB is random.
- Seventh (Ripple) – RGB is random.
- Eighth – RGB turned off.
Similar to the side backlighting, you can also customise the brightness.
- Fn + F5 – adjusts red brightness. 10 different levels.
- Fn + F6 – adjust green brightness. 10 different levels.
- Fn + F7 – adjusts blue brightness. 10 different levels.
- Fn + F8 – erases all red, green, and blue colour settings.
- Fn + Spacebar – turns on the colour palette which cycles through 108 different colours. Press the combination again to select the colour you want.
LED Zone RGB Recording
Lastly, you can create individual zones and configure the backlighting. To do this, you’ll need to press:
- Fn + F11 (CM1 Cycle) – turns on the user’s customised zone and colour, then adjusts this to Breathing mode, and lastly will turn off the CM1 cycle.
- Fn + F12 (CM2 Cycle) – turns on the user’s customised zone and colour, adjusts the zone to the Breathing effect, and will also turn off the CM2 cycle.
- Fn + PrtSc – records a new setting on CM1.
- Fn + Pause – records a new setting on CM2.
- Caps Lock + F5/F6/F7 – adjusts red, green, and blue LED colours
- Caps Lock + Scroll Lock – stops recording.
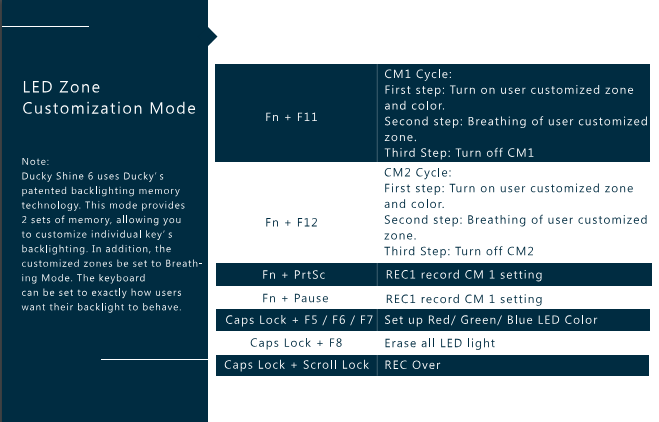
To record the RGB lighting for the CM1 and CM2 zones follow the steps below.
- Press Fn + PrtSc to record CM1 or Fn + Pause for CM2.
- When you start recording, Caps Lock will display the current LED brightness. This can be adjusted by pressing Caps Lock + F5, F6, F7, or F8. Once you reach your desired brightness, pressing any key will set it to that brightness.
- Repeating the steps listed above will allow you to customise your Ducky Shine 6 with multiple colours across different keys. If the key has been set already, press again to cancel.
- To finish your recording press Caps Lock + Scroll Lock.
Ducky Shine 7
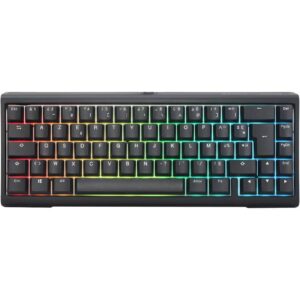
The Ducky Shine 7 includes per-key RGB backlighting and customisable LED zones to illuminate all your keypresses in stunning colour which you can seamlessly configure to suit your aesthetic.
RGB LED Backlit
Pressing Fn + F10 will cycle through the different lighting effects such as Breathe or Rain Drop. You can decrease or increase the speed of the effect by pressing (← / →). Holding Fn + F10 for 3 seconds will turn off all backlit modes, including the CM1 and CM2.
Only backlit modes with the cog (as shown in the above image) can be configured further. You can do this by pressing:
- Fn + F5 – Adjust colour red brightness by up to 10 levels.
- Fn + F6 – Adjust colour green brightness by up to 10 levels.
- Fn + F7 – Adjust colour blue brightness by up to 10 levels.
- Fn + F8 – Erases all red, green, and blue colour settings.
- Fn + Spacebar – Enters the colour palette which displays various colours. Pressing on the desired colour will automatically change your keyboard to match.
RGB LED Zone Customisation
To adjust individual RGB LED Zones, you’ll need the following shortcuts:
- Fn + F11 – Enters the CM1 cycle. Pressing this shortcut again will turn off the CM1.
- Fn + F12 – Enters the CM2 cycle. Pressing this shortcut again will turn off the CM2.
- Fn + PrtSc – Records CM1.
- Fn + Pause – Records CM2.
- CapsLock + F5/F6/F7 – Adjusts red, green, and blue LED colour.
- CapsLock + F8 – Erases all LED light.
- CapsLock + Spacebar – Enters the colour palette.
- CapsLock + Scroll Lock – Stops recording.
To record any lighting effects, press:
- Fn + PrtSc to start recording CM1 or Fn + Pause to record CM2.
- When recording, CapsLock will display your current LED colour. This can be adjusted by pressing CapsLock + F5 / F6 / F7 / F8. After setting your chosen colour, pressing any key on your keyboard will automatically adjust it to that colour.
- Repeating the steps listed above will allow you to configure alternating colours to different keys. If a key has already been set, press it again to cancel the setting.
- To stop recording, press CapsLock + Scroll Lock.
Ducky One 3
Similar to the One2 and Shine, Ducky One 3 keyboards feature both a customisable RGB backlit and zone recording.
RGB LED Backlit
Selecting Fn + F10 simultaneously will take you through all the different RGB settings for the LED backlighting. This includes:
- Wave
- Colour cycle
- Rain drop
- Ripple
- Rainbow reactive
- Reactive
- Halo
- Breathe
- 100% full backlit
- Radar mode
- Backlit off
You can cycle through all the different static colours by pressing Fn and +/- on your Ducky One 3.
Any RGB mode with a cog symbol next to it, as seen in the image above, can be further customised.
- Fn +F5 – adjusts red brightness. 10 different levels.
- Fn + F6 – adjusts green brightness. 10 different levels.
- Fn + F7 – adjusts blue brightness. 10 different levels.
- Fn + Spacebar – turns on the colour palette which features over 108 different colours. To select your desired colour, simply press on any key when it cycles through, and all the keys will automatically match.
RGB LED Zone Customising
In addition to customising the backlighting, you can also configure individual zones on the Ducky One 3.
The key combinations for the LED Zone customising are as follows:
- Fn + F11 (CM1 cycle) – turns on/off the user’s customised zone and colour.
- Fn + F12 (CM2 cycle) – turns on/off the user’s customised zone and colour.
- Fn + PrtSc– start recording CM1.
- Fn + Pause – start recording CM2.
- Caps Lock + F5, F6, F7 – adjusts red, green, or blue LEDs.
- Caps Lock + F8 – erases all LED colour.
- Caps Lock + Spacebar – turns on the colour palette.
- Caps Lock + Scroll Lock – stops recording.
Alternatively, if you wish to record your own RGB lighting via the different CM1 or CM2 zones, the steps are listed below.
- Begin by pressing Fn + PrtSc or Fn + Pause to record either CM1 or CM2.
- When the recording starts, the Caps Lock key will display the current LED colour. This can be adjusted by pressing Caps Lock + Spacebar to unlock the colour palette. Pressing any key on the keyboard will set it to that colour.
- Repeating the steps above will allow you to set different colours across the keys. If the key has already been set, press it again to cancel.
- To finish your recording, select Caps Lock + Scroll Lock.
Ducky One 3 Pro
The Ducky One 3 Pro includes per-key RGB backlighting to illuminate all your keypresses in stunning colour which you can seamlessly customise to suit your aesthetic.
Pressing Fn + Alt + F10 will take you through all the different RGB modes. This includes:
- 100% backlit
- Wave (default)
- Colour Cycle
- Rain Drop
- Ripple
- Rainbow Reactive
- Reactive
- Halo
- Breathe
- Radar
- Laser
- Backlit Off
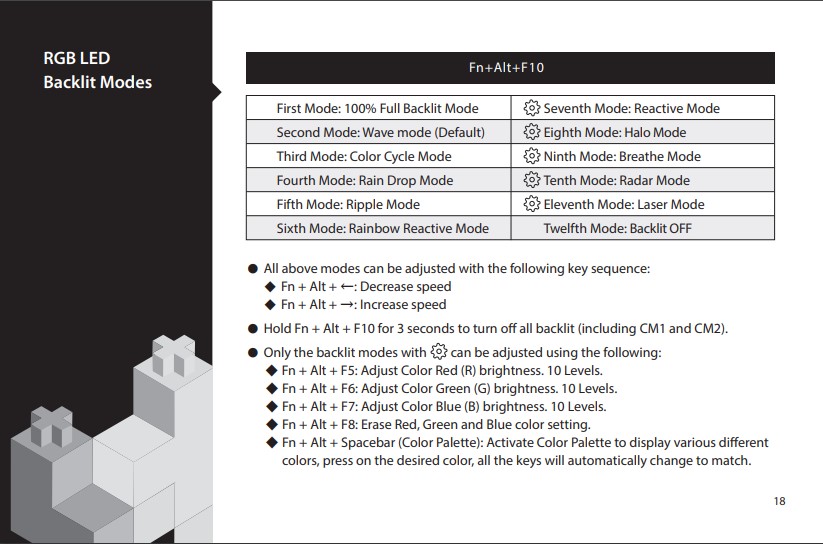
All of these can be adjusted by pressing the following shortcuts:
- Fn + Alt + ←/→ – increase or decrease the speed.
- Hold Fn + Alt + F10 for three seconds to turn off all the backlit, including CM1 and CM2.
- Any RGB mode highlighted with a cog symbol next to it, as seen in the image above, can be customised further.
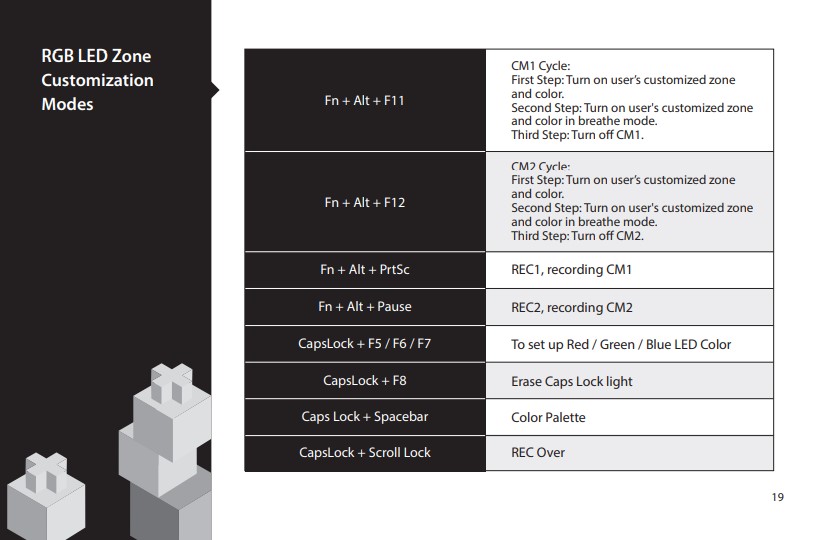
In addition to this, the Ducky One 3 Pro also features customisable RGB LED Zones. The shortcuts for this are as follows:
- Fn + Alt + F11 – CM1 Cycle. First turns on the zone and colour, second switches it to Breathe mode, and thirdly turns off the CM1.
- Fn + Alt + F12 – CM2 Cycle. First turns on the zone and colour, second switches it to Breathe mode, and thirdly turns off the CM2.
- Fn + Alt + PrtSc – starts recording CM1.
- Fn _ Alt + Pause – starts recording CM2.
- CapsLock + F5 / F6 / F7 – sets up Red/Green/Blue LED colour.
- Caps Lock + Spacebar – turns on the colour palette.
- CapsLock + Scroll Lock – stops recording.
Alternatively, you can also record your own via the CM1 and CM2 cycles by pressing the following:
- Fn + Alt + PrtSc to record the CM1.
- Fn + Alt + Pause to record the CM2.
- When in recording mode, CapsLock will display the current LED colour which can be adjusted by pressing CapsLock + Spacebar. After selecting your desired colour, hitting any key will automatically set your keyboard to that colour.
- Repeating the above steps will allow you to set different colours to your keys. If the key has already been customised, pressing it again will cancel the setting.
- To finish recording, press CapsLock + Scroll Lock to stop.

Ducky recommends that you first adjust the colour, and then move onto adjusting the individual keys. Some other important things to consider are:
- When starting recording mode, CapsLock will display the last colour used.
- CM1 has priority over CM2.
- Entering the recording mode will display the previously saved setting.
- If no changes are made within 30 seconds in the recording mode, the recording session will terminate without saving.
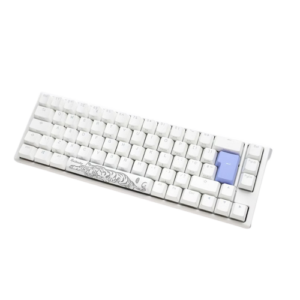
Ducky Project D Tinker
The last keyboard we’re showcasing is the Ducky Project D Tinker. The Tinker features a customisable RGB LED backlit. You can adjust the lighting effect, speed, and brightness of the RGB.
- Fn + R – toggles the RGB.
- Fn + T – RGB Mode +
- Fn + Y – RGB Mode –
- Fn + → – speed +
- Fn + ← – speed –
- Fn + ↑ – brightness +
- Fn + ↓ – brightness –
In addition to this, you can cycle through static colours by pressing Fn and +/-.

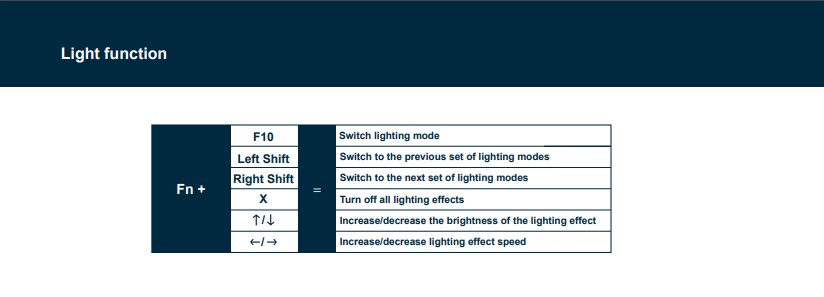
Ducky Zero 6108
The Ducky Zero 6108 features per-key RGB backlighting which you can configure to suit your personal style. To customise the lighting on your Ducky Zero 6108, you’ll need the following keyboard shortcuts:
- Fn + F10 – switch lighting mode
- Fn + Left Shift – switch to the previous lighting effect
- Fn + Right Shift – switch to the next lighting effect
- Fn + X– turn off all lighting effects
- Fn + ↑/↓ – increase or decrease the brightness of the lighting effect
- Fn + ←/→ – increase or decrease the speed of the lighting effect
Pressing Fn and +/- will also cycle through static colours available on the Ducky Zero 6108.
Our Favourite Ducky Keyboards!
Ducky One 3 Classic 65% USB Mechanical Gaming Keyboard
- Mechanical gaming keyboard
- 65% form factor
- Built with QUACKY mechanics
- PBT double-shot keycaps
- Per-key RGB backlighting
- Detachable USB-C cable
Ducky One 3 Aura TKL 80% USB Mechanical Gaming Keyboard
- Mechanical gaming keyboard
- 80% form factor
- Built with QUACKY mechanics
- This model comes with Cherry MX Black key switches
- PBT double-shot keycaps
- Per-key RGB backlighting

Ducky ProjectD Tinker 65% Mechanical Gaming Keyboard
- Mechanical gaming keyboard
- 65% form factor
- Hot-swappable
- This model comes with Cherry MX Red key switches
- PBT double-shot keycaps
- Per-key RGB backlighting
Ducky Zero 6108 Classic Wireless Mechanical Gaming Keyboard
- Mechanical gaming keyboard
- Full-sized
- Tri-mode connectivity – 2.4GHz, Bluetooth, and USB wired
- Hot-swappable
- This model includes Cherry MX2A Red key switches
- PBT double-shot keycaps
- RGB backlighting
Ducky One 3 Pro Nazca 60% Mechanical Gaming Keyboard
- Mechanical gaming keyboard
- 60% form factor
- Hot-swappable technology
- This mode comes with Cherry MX2A Speed Silver switches
- Triple-shot PBT keycaps
- RGB backlighting
All Your Keyboard Questions Answered!


- 22 min read
Ruth Rowley
Author
Ruth has been with Overclockers UK for over a year and has gone on to write about everything ranging from in-depth hardware guides to monthly game releases.
Outside of writing blog posts, she can be found wrapped in a blanket with her black cat, engrossed in a book or playing life-simulation games such as The Sims, Stardew Valley, and Animal Crossing.
Read More >>
I must be doing it wrong somehow because none of the key combinations work.
How strange! What model do you have?
On mine it worked when I used Fn+Alt wherever it said to use Fn.
thanks!
via GIPHY
Facing some rgb issues with a Ducky one 2 RGB 100% sized, none of the hot keys for rgb work except holding both windows keys to reset and holding Fn + F10 to turn rgb off. I have verified that all keys are being detected by windows.
If you are concerned there is something wrong with your keyboard, it is best to contact customer services.
Thank you so much. It’s much better explained than in original Ducky manual.
via GIPHY
i have a ducky mini and it only stays on red please help ?
Do you have the Ducky Mecha Mini? We are currently updating our guide with more instruction sets for other Ducky models – hopefully we’ll have some answers for you soon!