Your new shiny PC has just arrived and now it’s time to get it plugged in and set up. But wait… what to do with all your old files?
Thankfully, you don’t have to undergo a painful goodbye with your favourite pictures, videos, and precious memories. In fact, it’s super easy to transfer data across to your new gaming PC, and we’re here to show you step-by-step how to do this!
Why You Should Transfer Your Data
Transferring all your old data across may sound incredibly tedious, but it’s a step you certainly don’t want to miss when setting up your new PC. It means you can continue to store all your precious memories from images to videos on your new PC, without having to worry about losing anything. Or picking and choosing which files to keep and which to delete.
How to Transfer Your Data from Your Old to New PC
There are multiple ways to transfer data between computers. We’ve broken them all down below.
Manually via External Hard Drives or USB
A manual transfer via an external hard drive or USB memory stick is extremely straightforward as these devices allow you to move large volumes of data simultaneously. All without requiring a stable internet connection.
If this is how you decide to move your files, all you need to do is:
- Connect your external drive or USB to your old PC
- Copy all the files you want to transfer to your new PC
- Safely eject your drive
- Connect it to your new PC
- Copy all the files across to your new computer
Move via the Cloud
The cloud, and we’re not talking rain clouds, is the easiest way to transfer data between devices. The cloud is incredibly convenient, easy to use, and boasts integrated security features such as data encryption. Plus, you’ve got endless choices of which cloud-based service to use. This includes:
- DropBox
- GoogleDrive
- OneDrive
- WeTransfer
This method allows you to upload your chosen files to the cloud and then download them on your new gaming PC. However, this does come with the downside of requiring a stable internet connection to do so. Standard broadband just might not cut it. What’s more, you may also have to contend with the possibility of paid membership to remove potential limitations on capacity.
Direct Cable Transfer
Alternatively, another method for moving your data is direct cable transfer. This method requires a dedicated USB transfer cable and a free USB port on both your PCs. The specialised cable will typically come with a transfer guide and may require a specific type of software as well.
Via a Network
If your old and new PCs are connected to the same network, you can enable fire sharing to transfer data. This method is super-fast, especially if you are connected to your router via an ethernet cable, saving you time. To move your files via the Wi-Fi, you need to follow these steps:
- Enable file sharing on both your PCs
- Connect your computers to the same network
- Find the shared folder on your network
- Copy files between your PCs
Third-Party Moving Software
In addition to this, you can opt to use third-party software such as LapLink PC Mover. These have been optimised to make the moving process even easier, allowing you to choose which files or settings you want to transfer, move all your applications without a reinstall, and transfer any user accounts.
However, some third-party software may require an additional fee for you to use. The upside to this is that they do seriously streamline the entire process for those looking for a quick and easy way to transfer their data.
Via Windows Back Up
Integrated into every Windows PC is Windows Backup. This handy tool allows you to easily back up virtually everything, from your files, settings, installed applications, and even information about your favourite Wi-Fi networks.
To create a backup via Windows, you’ll need to first ensure you have a Microsoft account as your back up will be stored with your account. From here go into Start > All Apps > Windows Backup. Select what you want to back up by toggling the on/off switch, this includes both files and any settings.
When it comes to moving your data across to your new PC, you’ll simply need to log into your Microsoft account on your computer to assign your existing backup.
System Imaging
In addition to this, you could also transfer your files by creating a system image. A system image is an exact copy of your hard drive. This process will save everything you have stored on your drive, including your OS, system settings, files, installed programs, and more. It serves as a one huge back up of your entire PC.
Windows includes a built-in tool to allow you to create a system image. Simply go into Settings or the Control Panel > System & Security> Backup and Restore (Windows 7).
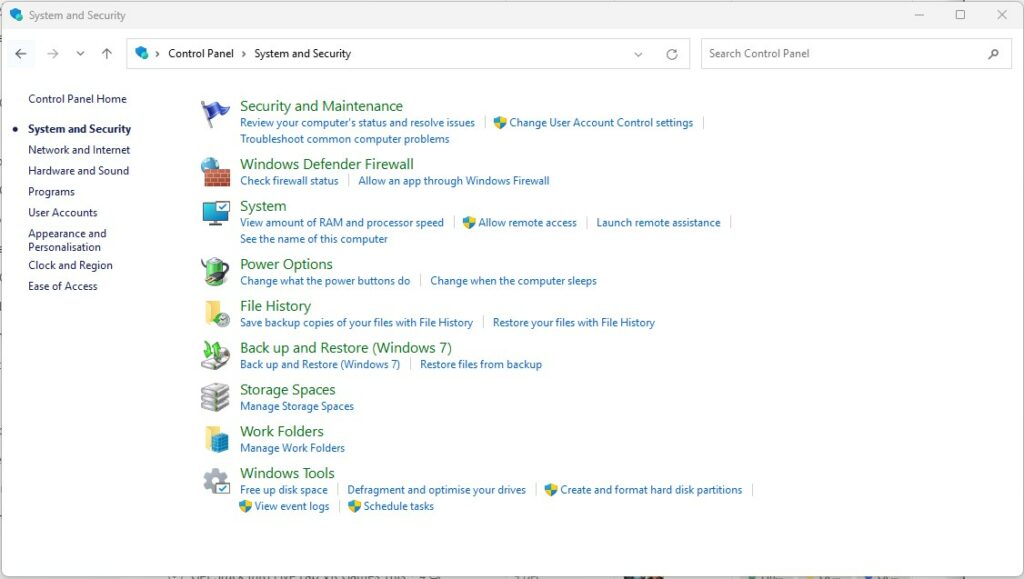
Here you’ll be able to select ‘Create a System Image’ > ‘On a Hard Drive’ > proceed to click the drive you wish to create an image of from the drop-down menu. After this, you’ll simply need to follow the on-screen instructions to successfully finish creating your system image.
Via SATA
Last on our list is moving via SATA connectors. This method involves disconnecting your hard drive from your old computer, connecting it to your new PC via a SATA cable, and copying across any files you wish to save.
This is arguably the fastest method we’ve mentioned. However, we don’t recommend you opt for this method unless you are comfortable with the inner workings and components of your PC.
Our Top Tips for a Stress-free Moving Day
If you’re looking for a few expert tips to help you on moving day, we’ve listed a few below.
- Organise your files. We recommend you do this before you begin the moving process as it will save you time, space, and a lot of energy. No endless searching for that one image or file!
- Run a virus check. We suggest you perform an anti-virus check on your old PC before you move any of your files. This removes the risk of you accidentally transferring any malware to your new computer.
- Ensure everything has been transferred before you delete them! This one may sound obvious, but it’s a crucial step. Before you go on a deleting spree and remove all your files off your old PC, make sure you’ve transferred everything correctly to your new PC. This may just save you a lot of heartache in the future…
- Back up your important data. We can’t stress the importance of backing up your data enough. This ensures you’ll have a secure copy of all your data, before you begin the moving process. Just in case the worst happens.
In Need of a Storage Boost?
Have you quickly filled up your new PC with all your existing files? Do you have no more space for your expanding gaming library? It’s no time to panic, for you can find plenty of reliable storage solutions at Overclockers UK.
From HDDs to super-fast SSDs, we’ve got a storage drive to suit every specific need and set-up. In fact, we’ve highlighted a few faves below, but if these don’t come with the capacity you need, you can also browse the full range instead.
Seagate Barracuda 3TB Internal Hard Drive
- Internal hard drive
- 3TB capacity
- 5400RPM
- 3.5” inches
- 256MB cache
Crucial BX500 2TB 2.5′ SATA Solid State Drive
- Solid state drive
- 2.5” inches
- SATA compatibility
- 2TB capacity
- 540MB/s read speed
- 500MB/s write speed
Lexar NM790 2TB NVMe PCIe 4.0 M.2 Solid State Drive
- Solid state drive
- NVMe PCIe M.2
- PCIe 4.0
- 7400MB/s read speed
- 6500MB/s write speed
- Integrated heatsink
Learn More About Your PC Hardware

Share Your Moving Day Tips!
Do you have any tips for those who are transferring their old files and data to a new PC? Did we perhaps miss off on an easier way to do it? Share it in the comments below.
- 7 min read
Ruth Rowley
Author
Ruth has been with Overclockers UK for over a year and has gone on to write about everything ranging from in-depth hardware guides to monthly game releases.
Outside of writing blog posts, she can be found wrapped in a blanket with her black cat, engrossed in a book or playing life-simulation games such as The Sims, Stardew Valley, and Animal Crossing.
Read More >>